
干货 | Nginx实现Elasticsearch后台服务的负载均衡
来源:互联网
时间:2026-08-23 07:33:25
1、题记
2、为什么是Nginx?
Nginx是俄罗斯软件工程师Igor Sysoev开发的免费开源web服务器软件。nginx于2004年发布,c语言开发,聚焦于高性能,高并发和低内存消耗问题。并且具有多种web服务器功能特性:负载均衡,缓存,访问控制,带宽控制,以及高效整合各种应用的能力,这些特性使nginx很适合于现代网站架构。
在国内,已经有淘宝、新浪博客、新浪播客、网易新闻、六间房、56.com、Discuz!、水木社区、豆瓣、YUPOO、海内、迅雷在线等多家网站使用 Nginx 作为Web服务器或反向袋里服务器。
3、Nginx通过反向袋里实现负载均衡
NginX 本质上是一款高性能的反向袋里服务器;同时,它也能充当 IMAP、POP3、SMTP 袋里服务器;另外,它本身还是一个 Http 服务器。换句话说,Nginx 既可以直接托管网站、处理 Http 请求,也可以作为反向袋里服务器来使用。
所谓反向袋里,服务的对象并不是用户本身,而是后面的内容服务器。用户先访问反向袋里服务器(nginx 服务器),再由这台反向袋里服务器判断并转发请求,决定具体交给哪一台服务器处理。
注意:真正带来性能提升的,并不是“反向袋里”这四个字本身,而是反向袋里把请求分发到后端服务器(N 台),通过轮询等方式让多台后端服务器共同处理业务,从而提升整体逻辑处理能力,最终达到提高系统性能的效果。
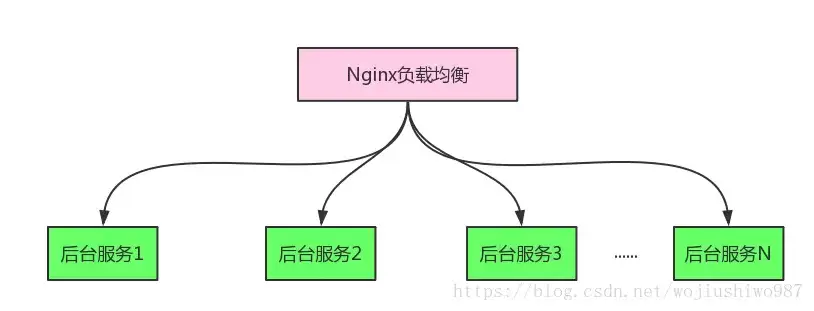
显然,Nginx起到的核心作用如下:
1、分流请求
2、负载均衡
4、Linux下nginx的安装
4.1.正则表达式库安装
1)确保进行了安装了linux常用必备支持库。用命令rpm -qa | grep gcc 检查是否安装了g 、gcc。若未安装请使用命令:# yum install gcc-c 进行安装。2) 下载pcre-8.12.tar.gz, nginx-1.5.0.tar.gz 到 /usr/local/src/nginx目录下。3)解压pcre-8.12.tar.gz# cd /usr/local/src/nginx# tar zxvf pcre-8.12.tar.gz4)进入解压后的目录# cd pcre-8.125)配置#./configure6) 编译#make7) 安装#make install4.2 Nginx安装
1) 创建用户nginx使用的www用户。#添加www组# groupaddwww #创建nginx运行账户www并加入到www组,不允许www用户直接登录系统# useradd -gwww www -s /bin/false 2)创建安装目录与日志目录创建安装目录# mkdir /usr/local/nginx创建日志目录# mkdir /data0/logs/nginx# chown www:www /data0/logs/nginx -R3) 判断系统是否安装了zlib-devel。如果没有安装。使用如下命令进行安装:# yum install -y zlib-devel4)Nginx下载解压切换目录到/usr/local/src/nginx目录下# cd /usr/local/src/nginx下载nginx到该目录将下载的文件解压# tar zxvf nginx-1.5.0.tar.gz5) 进入Nginx路径# cd nginx-1.5.06) 配置通常将软件安装在/usr/local/目录下。# ./configure --user=www --group=www --prefix=/usr/local/nginx --with-http_stub_status_module --with-http_ssl_module --with-http_realip_module注意:openssl的安装yum install -y openssl-devel7)编译# make8)安装#make install9)检查是否安装成功# cd/usr/local/nginx/sbin# ./nginx -t结果显示:nginx: the configuration file /usr/local/nginx/conf/nginx.conf syntax is oknginx: configuration file /usr/local/nginx/conf/nginx.conf test is successful则表示安装成功。4.3 Linux做负载均衡的配置
修改/usr/local/nginx/conf/nginx.conf
#userwww;worker_processes8;#修改为和服务器CPU核数一样#error_loglogs/error.log;#error_loglogs/error.lognotice;#error_loglogs/error.loginfo;#pidlogs/nginx.pid;events {worker_connections1024;}http {include mime.types;default_typeapplication/octet-stream;#log_formatmain'$remote_addr - $remote_user [$time_local] "$request" '#'$status $body_bytes_sent "$http_referer" '#'"$http_user_agent" "$http_x_forwarded_for"';#access_loglogs/access.logmain;sendfileon;#tcp_nopush on;#keepalive_timeout0;keepalive_timeout65;#gzipon;#将进行负载均衡的服务器及端口号配置在这里upstream backend {#ip_hashserver 192.168.12.15:19001;}server {listen 80;server_namelocalhost;#charset koi8-r;#access_loglogs/host.access.logmain;location / { #设置主机头和客户端真实地址,以便服务器获取客户端真实IP# proxy_set_header Host $host;# proxy_set_header X-Real-IP $remote_addr;# proxy_set_header X-Forwarded-For $proxy_add_x_forwarded_for; #禁用缓存# proxy_buffering off; #设置反向袋里的地址,将负载均衡的服务器变量backend设为反向袋里地址 proxy_pass http://backend;#root html;#indexindex.html index.htm;}#error_page404/404.html;# redirect server error pages to the static page /50x.html#error_page 500 502 503 504/50x.html;location = /50x.html {root html;}}}4.4 Nginx启停
1)检查配置文件是否正确
/usr/local/nginx-1.6/sbin/nginx -t./sbin/nginx -V # 可以看到编译选项2)启动 Nginx
./sbin/nginx # 默认配置文件 conf/nginx.conf,-c 指定3)停止Nginx
./sbin/nginx -s stop或pkill nginx4)重启 Nginx
# ./sbin/nginx -s reload或 kill -HUP `cat /usr/local/nginx-1.6/logs/nginx.pid`打造Elasticsearch基础、进阶、实战第一公众号

-

- 元宵节猜灯谜的祝福短信
- 角色扮演 |
-
- 关于柯南的沙雕网名有哪些
- 角色扮演 | 1
- 网名
-
- 最新中性名字男女通用网名有哪些
- 角色扮演 | 1
- 网名
-
- 关于蓝色说唱的网名有哪些
- 角色扮演 | 1
- 网名
-
- 我好喜欢你是什么梗?
- 角色扮演 |