
Redis集群部署及Springboot架构下应用(sentinel哨兵集群模式)
导航
主从集群 哨兵集群 分区集群
环境:
redis:5.0.8 Springboot: 2.2.3.RELEASE redis安装参见:CentOS7下安装Redis(单机版) redis主从部署参见:Redis集群部署及Springboot架构下应用(主从集群模式)
聊到Redis的高可用方案,哨兵模式绝对是绕不开的一个话题。今天我们就从部署到Springboot集成,把哨兵集群这块硬骨头彻底啃下来。
集群方式及配置
基础配置集群配置:
后台运行(守护进程)daemonize yes 去除保护模式(允许远程访问)protected-mode no#去除绑定(远程访问)#bind 127.0.0.1# 设置密码requirepass redispwd本次配置基于同一机器不通端口做集群,当redis位于不同机器时,部分配置可以省去(以下配置过程中会说明/【单机非必须】:当前机器仅运行一个redis实例)
sentinel哨兵集群
哨兵模式本质上是一种“监控+选举”的机制,它解决了主从复制集群中节点宕机后,无法自动进行故障转移的问题。说白了,就是给主从架构配了一个自动运维团队。
主从配置(略) Redis集群部署及Springboot架构下应用(主从集群模式) 哨兵16379配置 复制一份配置文件命名为sentinel16379.conf(来源安装目录:redis-5.0.8/sentinel.conf) 修改如下配置
#哨兵服务端口,注意不能跟redis服务端口冲突,且每个哨兵端口不一样port 16379#后台运行(守护进程)daemonize yes#pid写入路径pidfile /var/run/redis-sentinel16379.pid#log目录logfile "./sentinel/16379.log"#工作目录dir ./sentinel/16379#关闭保护模式(取消该行前注释即可)protected-mode no#设置监控主节点信息(参考一下该项的配置 )sentinel monitor mymaster 192.168.1.17 6379 2#设置redis密码sentinel auth-pass mymaster redispwd哨兵16380配置 复制sentinel16379.conf 重命名为sentinel16380.conf( 修改如下配置
#哨兵服务端口,注意不能跟redis服务端口冲突,且每个哨兵端口不一样port 16380#pid写入路径pidfile /var/run/redis-sentinel16380.pid#log目录logfile "./sentinel/16380.log"#工作目录dir ./sentinel/16380哨兵16381配置 复制sentinel16379.conf 重命名为sentinel16381.conf( 修改如下配置
#哨兵服务端口,注意不能跟redis服务端口冲突,且每个哨兵端口不一样port 16381#pid写入路径pidfile /var/run/redis-sentinel16381.pid#log目录logfile "./sentinel/16381.log"#工作目录dir ./sentinel/16381哨兵16382配置 复制sentinel16379.conf 重命名为sentinel16382.conf( 修改如下配置
#哨兵服务端口,注意不能跟redis服务端口冲突,且每个哨兵端口不一样port 16382#pid写入路径pidfile /var/run/redis-sentinel16382.pid#log目录logfile "./sentinel/16382.log"#工作目录dir ./sentinel/16382注意:
这里有个关键点,sentinel monitor mymaster 192.168.1.17 6379 2 这个配置项,2代表的是“最低通过票数”,也就是说,当至少2个哨兵认为master挂了,才会触发故障转移。所以哨兵的总数不能小于这个值,通常建议部署奇数个哨兵。
接下来是几个跟故障判定和切换相关的参数:
#判定master节点失活时间(单位毫秒)sentinel down-after-milliseconds mymaster 30000#主备切换时,sla ve最大同时同步个数(1:即主备切换每次一个sla ve节点向master同步)sentinel parallel-syncs mymaster 1#sentinel故障转移超时时间(单位毫秒)sentinel failover-timeout mymaster 180000192.168.1.17:master节点的地址 6379:master节点的端口 2 :最低通过票数
启动哨兵
./bin/redis-sentinel sentinel16379.conf ./bin/redis-sentinel sentinel16380.conf ./bin/redis-sentinel sentinel16381.conf ./bin/redis-sentinel sentinel16382.conf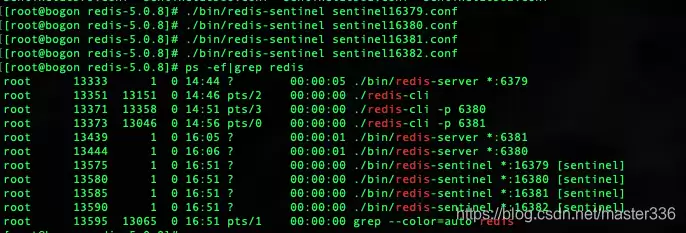 在这里插入图片描述
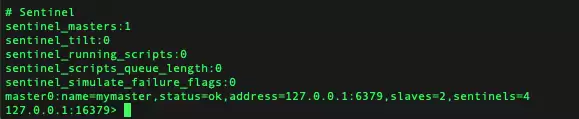
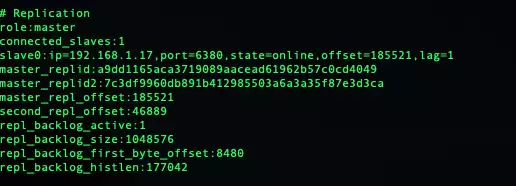
查看一下状态(info)
 在这里插入图片描述
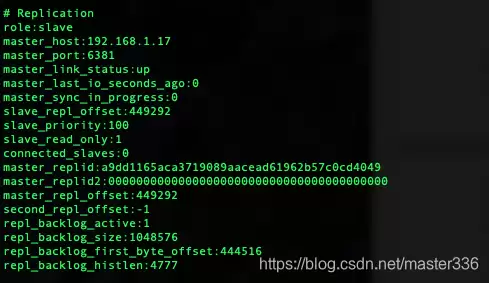
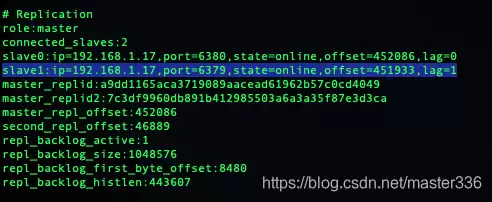
可以看到master节点状态、ip端口、从节点个数、哨兵个数4,一切正常。接下来,我们来模拟一下主节点宕机的场景。
kill master节点,查看主备切换
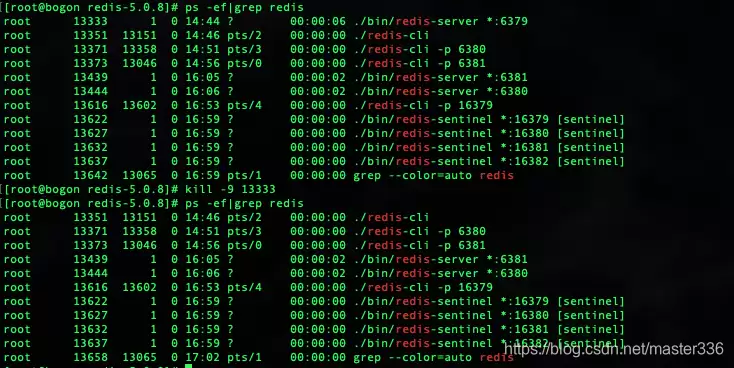 在这里插入图片描述
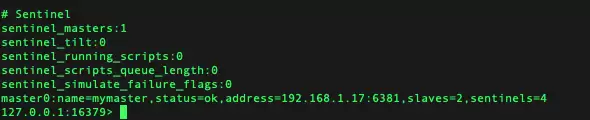
再次查看一下状态
 在这里插入图片描述
主节点已经切换至6381,哨兵自动完成了选举。查看新的master节点信息:
 在这里插入图片描述
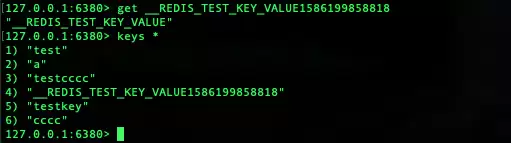
验证读写:
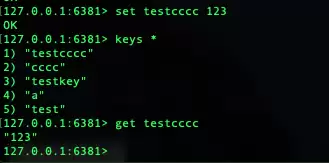 在这里插入图片描述
从节点读写:
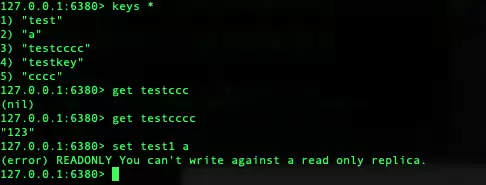 在这里插入图片描述
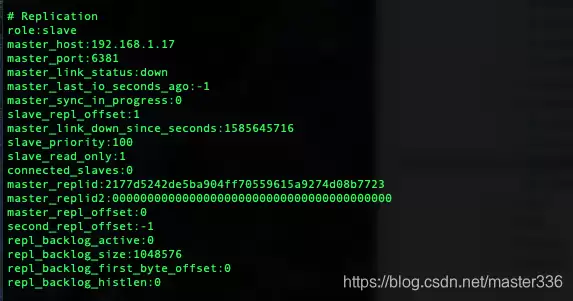
重启kill 掉的master节点,查看其状态
 在这里插入图片描述
 在这里插入图片描述
有意思的事情发生了。重启后的节点虽然识别了master信息,但并没有自动加入到sla ve列表里。查看master节点信息,它仍然显示是一个sla ve节点。这意味着新启动的节点无法正常加入集群工作。问题出在哪?
分析一下,这个节点是因为手动kill而宕机的,网络显然没问题。那么,它和一个全新的sla ve节点差了什么?回顾一下主从配置:
#主节点地址(ip 端口)sla veof 192.168.1.17 6379#master节点密码 ,(打开注释,修改master的密码即可)masterauth redispwd从info信息看,master节点的ip和端口是正确的。那么问题大概率出在密码上。一开始的master节点配置里,并没有配置masterauth。加上masterauth后重启,再看一下:
 在这里插入图片描述
查看master节点状态:
 在这里插入图片描述
问题解决了。这个小插曲也提醒我们,密码相关的配置一定要前后一致,缺一不可。
sentinel哨兵集群在Springboot中的配置
1. pom引入
org.springframework.boot spring-boot-starter-data-redis 2.yml配置(properties配置文件类型自行转换)
spring:redis: # 集群(哨兵)模式sentinel:nodes:- 192.168.1.17:16379- 192.168.1.17:16380- 192.168.1.17:16381- 192.168.1.17:16382master: mymaster3.封装RedisTemplate MyRedisConfig.ja va
import com.fasterxml.jackson.annotation.JsonAutoDetect;import com.fasterxml.jackson.annotation.PropertyAccessor;import com.fasterxml.jackson.databind.ObjectMapper;import org.springframework.boot.autoconfigure.data.redis.RedisProperties;import org.springframework.cache.annotation.EnableCaching;import org.springframework.context.annotation.Bean;import org.springframework.context.annotation.Configuration;import org.springframework.data.redis.connection.RedisConnectionFactory;import org.springframework.data.redis.connection.RedisNode;import org.springframework.data.redis.connection.RedisSentinelConfiguration;import org.springframework.data.redis.core.RedisTemplate;import org.springframework.data.redis.core.StringRedisTemplate;import org.springframework.data.redis.core.ValueOperations;import org.springframework.data.redis.serializer.Jackson2JsonRedisSerializer;import org.springframework.data.redis.serializer.StringRedisSerializer;@Configuration@EnableCachingpublic class MyRedisConfig {@Beanpublic RedisSentinelConfiguration redisSentinelConfiguration(RedisProperties redisProperties){ RedisSentinelConfiguration configuration = new RedisSentinelConfiguration(redisProperties.getSentinel().getMaster(),new HashSet<>(redisProperties.getSentinel().getNodes()));// 实际使用过程中发现,yml中的密码并不会赋值到 检查RedisSentinelConfiguration发现nodepasswd仅有get和set方法,需要手动加入configuration.setPassword(redisProperties.getPassword().toCharArray());return configuration;}@Beanpublic RedisTemplate redisTemplate(RedisConnectionFactory redisConnectionFactory) {RedisTemplate redisTemplate = new RedisTemplate<>();redisTemplate.setConnectionFactory(redisConnectionFactory);// 使用Jackson2JsonRedisSerialize 替换默认的jdkSerializeable序列化Jackson2JsonRedisSerializer jackson2JsonRedisSerializer = new Jackson2JsonRedisSerializer(Object.class);ObjectMapper objectMapper = new ObjectMapper();objectMapper.setVisibility(PropertyAccessor.ALL, JsonAutoDetect.Visibility.ANY);objectMapper.enableDefaultTyping(ObjectMapper.DefaultTyping.NON_FINAL);jackson2JsonRedisSerializer.setObjectMapper(objectMapper);// 设置value的序列化规则和 key的序列化规则redisTemplate.setKeySerializer(new StringRedisSerializer());redisTemplate.setValueSerializer(jackson2JsonRedisSerializer);redisTemplate.afterPropertiesSet();return redisTemplate;}/** * 对redis字符串类型数据操作 * * @param stringRedisTemplate * @return */@Bean({"valueoperations"})public ValueOperations valueOperations(StringRedisTemplate stringRedisTemplate) {return stringRedisTemplate.opsForValue();}} 4.测试Controller SysController.ja va
import com.platform.test.common.exception.BusinessException;import com.platform.test.service.SysService;import com.platform.test.vo.BaseRespVo;import org.slf4j.Logger;import org.slf4j.LoggerFactory;import org.springframework.beans.factory.annotation.Autowired;import org.springframework.beans.factory.annotation.Qualifier;import org.springframework.data.redis.core.RedisTemplate;import org.springframework.data.redis.core.ValueOperations;import org.springframework.web.bind.annotation.RequestMapping;import org.springframework.web.bind.annotation.RestController;import ja vax.servlet.http.HttpSession;import ja va.text.SimpleDateFormat;import ja va.util.Date;import ja va.util.HashMap;import ja va.util.concurrent.TimeUnit;@RestController@RequestMapping("/sys")public class SysController {static final Logger logger = LoggerFactory.getLogger(SysController.class);@Autowired@Qualifier("valueoperations")ValueOperations valueOperations;@AutowiredRedisTemplate redisTemplate;@AutowiredSysService sysService;final static String REDIS_TEST_KEY_VALUE = "__REDIS_TEST_KEY_VALUE";@RequestMapping("/health")public BaseRespVo health(HttpSession session) throws BusinessException {SimpleDateFormat sf = new SimpleDateFormat("yyyy-MM-dd hh:mm:ss");HashMap data = new HashMap<>();data.put("time-server",sf.format(new Date()));data.put("status-redis",checkRedis());return new BaseRespVo(data);} private boolean checkRedis() {long time = System.currentTimeMillis();if(valueOperations == null){return false;}try {valueOperations.set(REDIS_TEST_KEY_VALUE time,REDIS_TEST_KEY_VALUE,300, TimeUnit.MILLISECONDS);logger.info("写入redis key: " REDIS_TEST_KEY_VALUE time " value:" REDIS_TEST_KEY_VALUE);Thread.sleep(100);String value = valueOperations.get(REDIS_TEST_KEY_VALUE time);if (value!=null && REDIS_TEST_KEY_VALUE.equals(value)) {logger.info("读取redis key: " REDIS_TEST_KEY_VALUE time " value:" value);return true;}}catch (Exception e){logger.error("redis test exception!",e);}return false;}} 执行结果:
 在这里插入图片描述
sla ve节点:
 在这里插入图片描述
附:
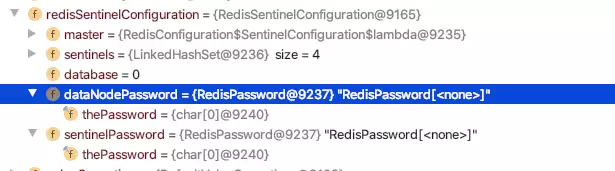
值得注意的是,在Springboot集成过程中,发现RedisSentinelConfiguration并不能自动从yml配置中读取密码,需要手动调用setPassword()方法。这个细节如果不注意,很容易导致应用启动后无法连接哨兵集群。如果你有更好的解决办法,欢迎交流。
 在这里插入图片描述
补充一点:
sentinel monitor的配置,选举出新的主节点,并自动更新自身配置文件。这才是哨兵模式真正的精髓所在。 


