
知识图谱构建实战:GraphRAG与Neo4j的结合之道
前言
之前我们聊过 GraphRAG 从原始文本里提取知识图谱、构建图结构的过程,最后生成的文件是 parquet 格式,存放在这样一个文件夹里:
那这次的任务就很明确了——把这些图谱文件塞进 Neo4j 图数据库里,然后做可视化分析。最后还能跟我们之前的混合检索项目串起来用,一鱼多吃。
一、准备工作
新建一个 Python 脚本,比如叫 graphrag_import.py,放项目根目录就行,位置随意。然后指向 GraphRAG 生成的图谱目录:
GRAPHRAG_FOLDER="artifacts"
如果还没装 neo4j 驱动,先装上:
pip install --upgrade --quiet neo4j
导入必要的库:
import pandas as pd
from neo4j import GraphDatabase
import time
配置 Neo4j 的连接信息:地址、账号、密码和目标数据库:
NEO4J_URI="bolt://********:7687"
NEO4J_USERNAME="neo****"
NEO4J_PASSWORD="*****"
NEO4J_DATABASE="****"
driver = GraphDatabase.driver(NEO4J_URI, auth=(NEO4J_USERNAME, NEO4J_PASSWORD))
另外还需要一份语料数据,可以从这里下载:https://www.gutenberg.org/cache/epub/24022/pg24022.txt。在根目录下建一个 /ragtest/input 空文件夹,把下载的文件放进去就好。
二、创建约束
先写一个批处理函数,用来分批把数据写入 Neo4j。参数很简单:要执行的 Cypher 查询语句、数据框(DataFrame)、以及每批的行数(默认1000)。
def batched_import(statement, df, batch_size=1000):
    total = len(df)
    start_s = time.time()
    for start in range(0,total, batch_size):
        batch = df.iloc[start: min(start+batch_size,total)]
        result = driver.execute_query("UNWIND $rows AS value " + statement,
                                      rows=batch.to_dict('records'),
                                      database_=NEO4J_DATABASE)
        print(result.summary.counters)
    print(f'{total} rows in { time.time() - start_s} s.')
    return total
Neo4j 的索引是用来加速图查询起点的,比如快速定位两个待连接的节点。为了避免重复数据,我们主要在实体类型的 ID 上创建唯一约束。同时会用到一些带双下划线的标签来区分不同节点类型:__Entity__、__Document__、__Chunk__、__Community__、__Covariate__。这些标签本身没有固定含义,完全取决于你的数据模型怎么设计。
__Entity__代表一个实体,比如公司、人物、地点。__Document__代表文档或文件,比如一本书、一篇文章。__Chunk__代表文档的片段(文本块),比如段落或句子。__Community__表示图结构中的社区或聚类,比如社交网络中兴趣相投的用户群体。__Covariate__代表协变量,在统计模型中与其他变量一起使用,可能影响数据点的属性。
举个简单的查询例子:
MATCH (e:Entity)-[:CONTAINS]->(d:Document)
WHERE e.type = 'Community' AND d.covariate = 'SomeValue'
RETURN e, d
它找的是类型为 "Community" 的实体,以及它们包含的、具有特定协变量值的文档。当然,实际用法因场景而异,关键是根据具体需求设计好数据模型。至于 Neo4j 的查询细节,以后有机会再展开。
下面是创建约束的语句,用字符串分割成多条分别执行:
statements = """
create constraint chunk_id if not exists for (c:__Chunk__) require c.id is unique;
create constraint document_id if not exists for (d:__Document__) require d.id is unique;
create constraint entity_id if not exists for (c:__Community__) require c.community is unique;
create constraint entity_id if not exists for (e:__Entity__) require e.id is unique;
create constraint entity_title if not exists for (e:__Entity__) require e.name is unique;
create constraint entity_title if not exists for (e:__Covariate__) require e.title is unique;
create constraint related_id if not exists for ()-[rel:RELATED]->() require rel.id is unique;
""".split(";")
for statement in statements:
    if len((statement or "").strip()) > 0:
        print(statement)
        driver.execute_query(statement)
比如第一条的意思:对标签为 __Chunk__ 的节点,要求它们的 id 属性唯一,如果约束已存在则忽略。执行成功后会看到类似下面的结果:
三、导入文档
首先加载文档的 parquet 文件,用 pandas 读取,只保留 id 和 title 两列。注意这里不需要 text_unit_ids,因为我们可以通过关系关联,而且文本内容也会包含在块中。
doc_df = pd.read_parquet(f'{GRAPHRAG_FOLDER}/create_final_documents.parquet', columns=["id", "title"])
doc_df.head(2)
然后把文档数据写入 Neo4j:
# import documents
statement = """
MERGE (d:__Document__ {id:value.id})
SET d += value {.title}
"""
batched_import(statement, doc_df)
接下来处理文本单元。为每个 id 创建一个 Chunk 节点,设置文本和 token 数量,并且把它们和对应的 Document 节点关联起来。
text_df = pd.read_parquet(f'{GRAPHRAG_FOLDER}/create_final_text_units.parquet',
                          columns=["id","text","n_tokens","document_ids"])
text_df.head(2)
导入文本单元:
statement = """
MERGE (c:__Chunk__ {id:value.id})
SET c += value {.text, .n_tokens}
WITH c, value
UNWIND value.document_ids AS document
MATCH (d:__Document__ {id:document})
MERGE (c)-[:PART_OF]->(d)
"""
batched_import(statement, text_df)
这段 Cypher 的意思是:创建或更新一个 __Chunk__ 节点,设置属性;然后对每个相关的 document_id,找到对应的 __Document__ 节点,建立 PART_OF 关系。执行结果:
接着是实体:
entity_df = pd.read_parquet(f'{GRAPHRAG_FOLDER}/create_final_entities.parquet',
                            columns=["name","type","description","human_readable_id","id","description_embedding","text_unit_ids"])
entity_df.head(2)
导入实体:
entity_statement = """
MERGE (e:__Entity__ {id:value.id})
SET e += value {.human_readable_id, .description, name:replace(value.name,'"','')}
WITH e, value
CALL db.create.setNodeVectorProperty(e, "description_embedding", value.description_embedding)
CALL apoc.create.addLabels(e, case when coalesce(value.type,"") = "" then [] else [apoc.text.upperCamelCase(replace(value.type,'"',''))] end) yield node
UNWIND value.text_unit_ids AS text_unit
MATCH (c:__Chunk__ {id:text_unit})
MERGE (c)-[:HAS_ENTITY]->(e)
"""
batched_import(entity_statement, entity_df)
然后是关系:
rel_df = pd.read_parquet(f'{GRAPHRAG_FOLDER}/create_final_relationships.parquet',
                         columns=["source","target","id","rank","weight","human_readable_id","description","text_unit_ids"])
rel_df.head(2)
导入关系:
  rel_statement = """
    MATCH (source:__Entity__ {name:replace(value.source,'"','')})
    MATCH (target:__Entity__ {name:replace(value.target,'"','')})
    // not necessary to merge on id as there is only one relationship per pair
    MERGE (source)-[rel:RELATED {id: value.id}]->(target)
    SET rel += value {.rank, .weight, .human_readable_id, .description, .text_unit_ids}
    RETURN count(*) as createdRels
"""
batched_import(rel_statement, rel_df)
接下来是社区:
community_df = pd.read_parquet(f'{GRAPHRAG_FOLDER}/create_final_communities.parquet',
                     columns=["id","level","title","text_unit_ids","relationship_ids"])
community_df.head(2)
导入社区:
statement = """
MERGE (c:__Community__ {community:value.id})
SET c += value {.level, .title}
/*
UNWIND value.text_unit_ids as text_unit_id
MATCH (t:__Chunk__ {id:text_unit_id})
MERGE (c)-[:HAS_CHUNK]->(t)
WITH distinct c, value
*/
WITH *
UNWIND value.relationship_ids as rel_id
MATCH (start:__Entity__)-[:RELATED {id:rel_id}]->(end:__Entity__)
MERGE (start)-[:IN_COMMUNITY]->(c)
MERGE (end)-[:IN_COMMUNITY]->(c)
RETURN count(distinct c) as createdCommunities
"""
batched_import(statement, community_df)

最后是社区报告:
community_report_df = pd.read_parquet(f'{GRAPHRAG_FOLDER}/create_final_community_reports.parquet',
                               columns=["id","community","level","title","summary", "findings","rank","rank_explanation","full_content"])
community_report_df.head(2)

导入社区报告:
# import communities
community_statement = """
MERGE (c:__Community__ {community:value.community})
SET c += value {.level, .title, .rank, .rank_explanation, .full_content, .summary}
WITH c, value
UNWIND range(0, size(value.findings)-1) AS finding_idx
WITH c, value, finding_idx, value.findings[finding_idx] as finding
MERGE (c)-[:HAS_FINDING]->(f:Finding {id:finding_idx})
SET f += finding
"""
batched_import(community_statement, community_report_df)

到这里,所有的 GraphRAG 文件都已经成功导入。接下来可以打开 Neo4j 的浏览器界面做可视化分析。每个实体节点都可以点开查看,比如以“石猴”为中心的关系网络一目了然。
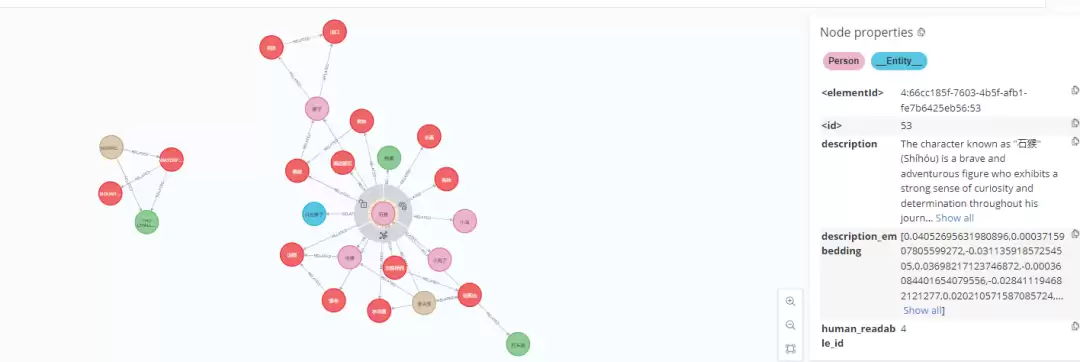
点开社区节点,能看到针对某一事件的整合信息,以及关联的人物。可视化分析的方式还有很多,比如查看文档、文本单元等。具体怎么分析,取决于输入检索文本的类型和你想挖掘的信息,但最终结果都相当直观。
四、总结
通过导入操作,我们把 GraphRAG 生成的图文件存储到了 Neo4j 中,然后利用 Neo4j 的可视化能力来观察 GraphRAG 索引结果。这样一来,整个索引结果的结构和关联都变得清晰可辨,分析效率也上了一个台阶。
-

- 关于宇宙的好的网名有哪些
- 角色扮演 | 1
- 网名